How To Make Fabric Covered Buttons: Step By Step Guide & Infographic
- Feb 13
- 5 min read
Updated: Feb 23
Fabric-covered buttons are an excellent finishing touch for many sewing projects, from tufted cushions to button-front garments. And the good news is, they're easy to make at home! All you need is a cover button kit, some fabric and a few tools you probably already have on hand. You can use leftover fabric from your project for a perfect match, or pick a decorative or contrasting fabric to make your button stand out. Follow the instructions below to learn how to make fabric-covered buttons three ways. You can also print or save the illustrated guide at the end of this post for future reference. Let's get started!
WHAT YOU NEED:
Fabric
Pencil, flathead screwdriver or other small tool (optional)
Universal Self-Cover Button Making Tool (optional)

HOW TO COVER BUTTONS WITH FABRIC
We recommend using a button cover kit to make covered buttons. At WAWAK, we offer two types: Round Cover Button Kits and Half Ball Cover Button Sets. Both let you make fabric shank buttons with your chosen fabric and work best with light to medium-weight materials. Half ball sets are often available in larger quantities and are a popular choice for home decor, but the main difference between the two types is how each style works. Before you begin, check which type you have so you can follow the right instructions. Both methods are explained below, along with an infographic for your reference. Let's get started!
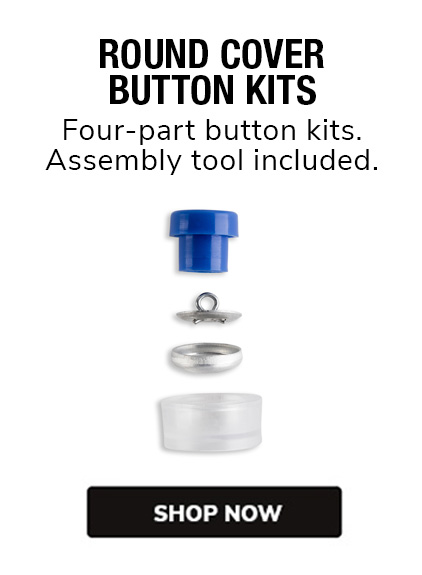
Using A Round Cover Button Kit
A standard cover button kit consists of four parts: a mold to shape the fabric around the button, button shells (the front of the button), button backs and a pusher tool to secure everything in place. If this is the style of button kit you have, read on to learn how to make covered buttons!
1. Choose Your Button Size
Cover button kits are available in a variety of sizes. Check out our Button Size Chart for a real-size reference to find the right size for your project.
2. Cut The Fabric To Size
The amount of fabric needed to cover the bottom must be larger than the shell's diameter to cover the sides and be secured. Some button cover kits come with a template printed on the back of the packaging that can be used to trace the correct fabric size. Place the provided button template or the button shell on the fabric to use as a guide. Trace and cut out the circle. For sheer fabrics, use 2 layers of fabric, or add a layer of interfacing.
3. Center The Fabric
Center the fabric right side down over the mold. Place the shell on top of the fabric, making sure it is also centered over the mold.
4. Push To Secure The Fabric
Use the pusher to push the shell and the fabric down into the mold, securing the fabric into place.
5. Tuck The Fabric Into The Shell
Tuck the fabric edges into the back of the shell.
6. Push The Back Into Place
Center the back over the tucked-in fabric and firmly push down with the pusher until the back snaps into place.
7. Remove The Button
Remove the pusher and push up from the bottom of the mold to remove the button.


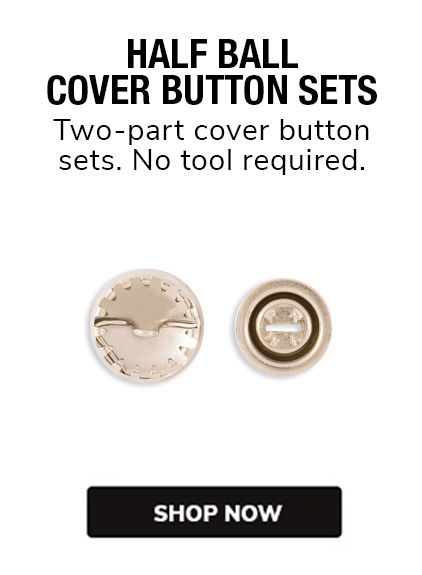
Using A Half Ball Cover Button Set
Half Ball Cover Button Sets consist of two parts: one shell and one back for each button you'll be making. The button shell features jagged "teeth" along its edges, which you'll use to hold the fabric in place. For half ball sets, follow these easy steps:
1. Choose Your Button Size
Half Ball Cover Button Sets are available in a variety of sizes. Check out our Button Size Chart for a real-size reference to find the right size for your project.
2. Cut The Fabric To Size
The amount of fabric needed to cover the bottom must be larger than the shell's diameter to cover the sides and be secured. Some button cover sets come with a template printed on the back of the packaging that can be used to trace the correct fabric size. Place the provided button template or the button shell on the fabric to use as a guide. Trace and cut out the circle. For sheer fabrics, use 2 layers of fabric, or add a layer of interfacing.
3. Center The Fabric
Center the fabric under the button shell.
4. Secure The Fabric
Working from side to side and top to bottom, hook the fabric onto the shell's teeth. Begin by attaching opposite sides of the fabric, then work your way around the shell a bit at a time. Use a pencil eraser or flathead screwdriver to push the fabric edges inside the shell.
5. Snap On The Back Plate
Snap the back plate onto the shell.
6. Press Down To Secure
If the fabric is thick, use a spool of thread to press down on the back to secure it.
Bonus: Using a Button Maker Tool
Half Ball Cover Button Sets don't require a button covering machine or any special tools to assemble. However, if you plan to make a large quantity of buttons with this style of button, it can be helpful to use a button-making tool, like our Universal Self-Cover Button Maker Tool. To use a button maker tool for half ball cover buttons, use the following method:
1. Choose Your Button Size & Cut The Fabric
Follow steps 1-2 above for Half Ball Cover Button Sets to size your button and fabric.
2. Center The Fabric & Shell
Place the fabric circle right side down on top of the correct mold for your button size. Place the button shell on top of the fabric. Ensure both are centered over the mold.
3. Push The Shell & Fabric Into The Mold
Push the button shell into the mold and tuck in the fabric edges. If desired, use a tool like a pencil to help gather the fabric into the button shell.
4. Attach The Button Back
Place the button back (ridged side down) inside the mold. Then, enclose the button inside the tool by attaching the tool's "lid" or pusher. Be sure to align the correct sizes of the pusher and the mold together. Press down on the tool or tap it with a rubber mallet until the two parts snap together.
4. Remove The Button
Remove the top from the tool and remove your finished button from the button mold.
And with that, your fabric-covered button is complete! Whichever method you use, you're sure to create a perfectly matched fabric shank button for your projects. Find what you need to make covered buttons and much more at WAWAK, and don’t forget to save the diagram below for illustrated instructions on how to make covered buttons. Happy sewing!
Save this handy guide for visual instructions on how to cover buttons with fabric using a cover button kit.


